In the world of software and web development, it is very important to maintain order and also track changes on your project. That’s where Git comes in. Git is a distributed version control system (VCS) that allows you to track changes in your files and collaborate effectively with other developers to manage the source code efficiently. What exactly is version control, and why is git so important? A version control system is a tool that helps developers to track changes made to files over time. It also enables multiple developers to collaborate on a project without overwriting each other’s work. There are a few version control systems such as, Mercurial, Git, Apache Subversion, and Bitbucket. On this blog, we will solely focus on Git and GitHub.
Git Installation.
Before we dive into the world of Git, it is essential to ensure that you have Git installed on your computer.
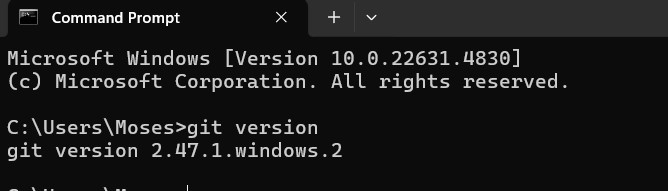
To check if you have Git installed, open Command Prompt on Windows, Terminal on macOS and Linux and type the following command. git--version. You should see an output displaying the version of Git installed on your machine which means git is installed on your computer.
If Git installed on your machine, here is a step-by-step procedure on how to install Git on Windows.
Download the Git installer from the official Microsft website.
Run the installer and follow the instructions. (make sure to keep the default settings)
Once the installation is complete, pen command prompt and type this command git--version to verify the installation.
version number output means git is installed, any other output means git not installed
Git Configuration
Once you have confirmed that Git is installed on your computer, the next step is to configure your username and your email address. This is very important since every git commit will use this information to track the changes made to the repository.
Here is how you configure this information.
Step 1: Open Command Prompt to enter the configuration commands.
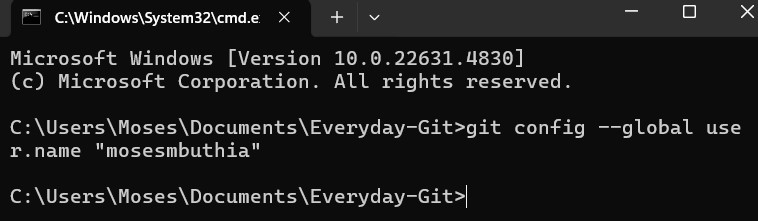
To set your git username, type the following command and press enter. git config --global user.name “Your Name”
username configuration command
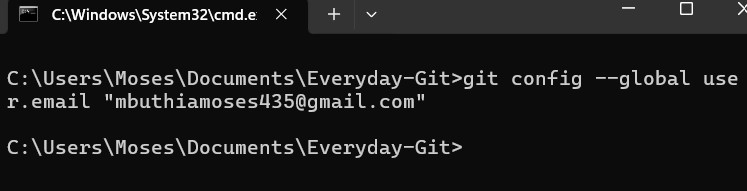
To set your Git email, type the following command and press enter. git config --global user.email “youremail@example.com”
user email configuration command
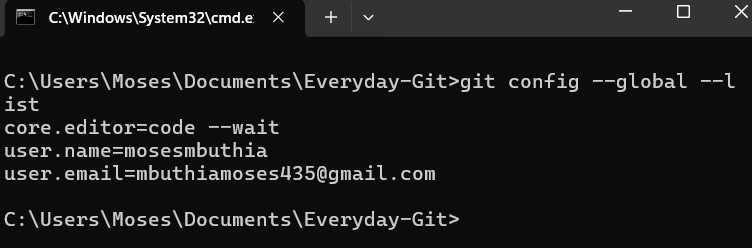
Step 2: Verify your configuration by typing the following command. git config --global --list
confirm correct user name and email command
This command will display your configuration settings including your username and email address.
Understanding and Initializing a Git Repository
Git Repository
This is a storage space where all your project files, along with their revision history are stored. This incudes additions, deletions, and modifications to your files. This allows the developer to revert to previous versions, track progress, and collaborate with other developers.
Repositories can be local (stored on your machine) or remote (hosted on platforms like GitHub). You can push changes from the local repository to the remote repository and pull updates from the remote repository to your local machine.
Here is how to Initialize a Git Repository.
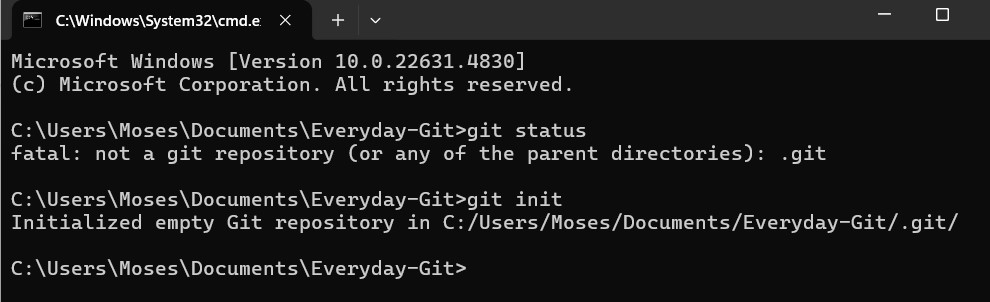
Open Command Prompt and type the following command. git init
innitializing a git repository command
To verify if your git repository has been initialized, type the following command. git status
Adding Files to the Staging Area
Before adding changes to a Git repository, you need to add them to the staging area. The staging area is a space where you can organize and review changes before committing them to the repository. Think of this as a holding area where you can decide which changes to include in your next commit.
Here is how to add files into the staging area.
adding files to the staging area command
Open Command Prompt and type in the following command git add “Filename” to add a specific file.
To add all changes in the current directory to the staging area, type the following command
git add .
Tracked vs Untracked Files
Tracked files are files that Git is already aware of and are being tracked for changes. Once a file is added to the staging area and committed, it becomes a tracked file.
Untracked files are those that Git is not currently tracking, they are new files that have not been added to the staging area or committed to the repository.
To check the status of your files, use the following command git status
Committing Changes to a Git Repository
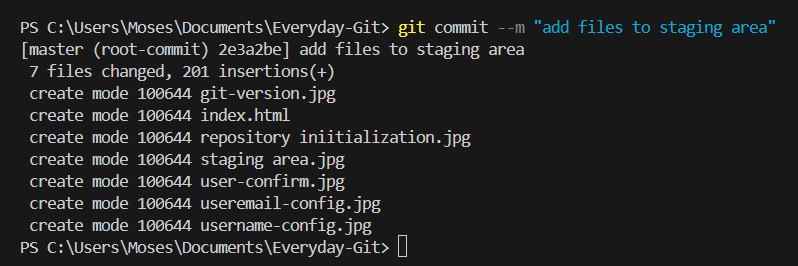
Once you've added your changes to the staging area, the next step is to commit them to the repository. Committing is crucial as it saves a snapshot of your project, enabling you to track and manage its history.
To commit files to a Git repository, open Command Prompt and type the following command git commit --m “Your Commit Message”
commiting files command
The –m flag allow you to include a commit message, which describes the changes you’ve made.
Writing a good commit message is essential for understanding the changes made to a project. Here are some tips on writing effective commit messages:
Write your message as a command ie Fix bug instead of Fixed bug
Explain the why not just the what to provide more context
Be concise yet descriptive
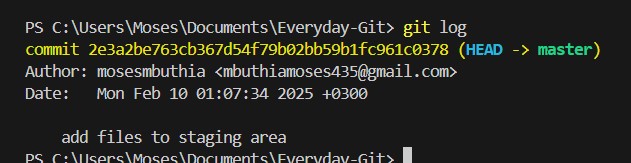
To view the history of commits in your repository, use the following command git log
viewing past commits
This command displays a list of past commits including their unique hash number, author, date, and the commit message.
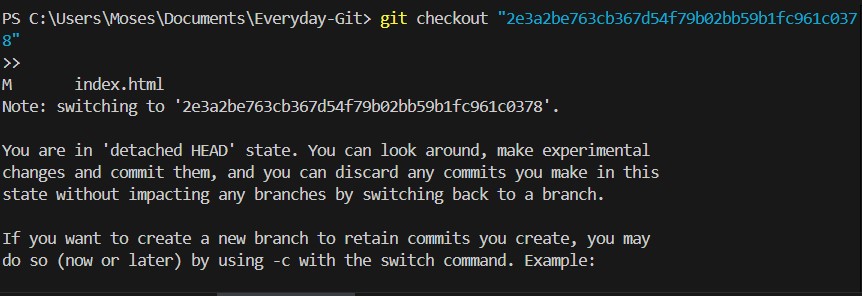
If you want to go back to a particular commit, use the git log to find the hash of the commit you want to revert to, then use the command git checkout to view the particular working directory of the project at that particular commit.
checking a past commit command
Branches in Git
A branch in Git is a separate line of development which allows developers to manage different versions of their codebase concurrently. When you create a new branch, you are creating a copy of your codebase at that particular point in time and you can make changes to this branch without affecting the main branch. The default branch in Git is called main or master.
Importance of Branches
Isolation of work to allow you to work on new features of fix bugs in isolation. This means changes made to this branch does not affect the main branch.
For collaboration: multiple developers can work on different branches simultaneously, enabling efficient collaboration.
Experimentation: branches provide a way to experiment with new ideas or prototypes without disrupting the main codebase. If the experiment is successful, it can be merged with the main codebase.
Version control: branches make it easier to manage different version of your project. E.g. You can have a branch for a stable release and another for next version under development.
Creating a Branch in Git
Creating branches in Git is a straightforward process. Here is how you can create a branch in Git.
Open Command prompt and navigate to your git repository and type in the following command git branch “branch name”
Replace branch-name with the desired name for your branch.
Viewing all Branches
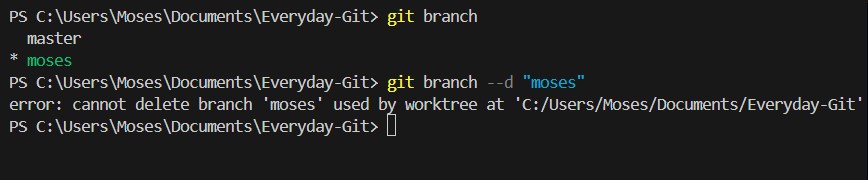
Once you have created a branch, you can view the branch by typing the following command (git branch), this command will display a list of all branches in the repository and the current branch will be highlighted with an asterisk (*) next to it.
check branch command
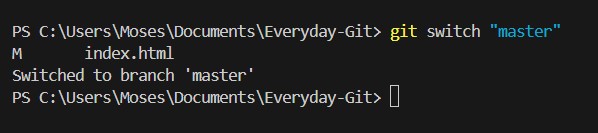
Switching Branches
You can switch to different branches in your Git repository by using the following command (git switch) “branch-name”. You can verify if you have successfully switched to the desired branch by typing the following command git branch note that the current branch will be highlighted with an asterisk (*)
switching a branch command
Merging Branches in Git
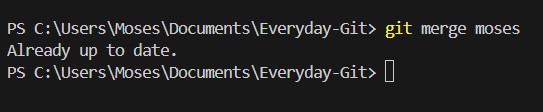
Merging allows you to integrate changes from one branch into another. When merging branches in Git, you have to switch to the branch you want to merge changes into (usually the master/main branch)
Use the following command to merge different branches, git merge (branch-name)
branch merging command
Deleting a Branch in Git
Sometimes, after merging changes or deciding that a particular branch is no longer needed, you might want to delete a branch. Here is how you delete a branch.
First, switch to the branch you want to delete, then type git branch --d “branch-name”
branch delete command
Next Steps for Mastering Git and GitHub
For your next steps, delve into remote repositories to push and pull changes, explore GitHub for collaboration by creating and managing repositories, and understand issues and pull requests. Expand your Git skills with advanced commands like rebasing, cherry-picking, and stashing. Automate your workflow with Git hooks, and integrate Continuous Integration/Continuous Deployment (CI/CD) tools like GitHub Actions to streamline your development process. By exploring these areas, you'll enhance your development workflow and collaboration skills significantly.